Showing posts with label DIY. Show all posts

Sunday, 7 August 2016

Gate-work

Since building the wall at the side of the house the old gate has been barely fit for purpose. As it happens we were wandering around around Snowshill Manor and Gardens a few months ago and spotted this:


Joe was inspired. It was also a good excuse for a trip to our local timbre merchants which is always a dangerous move. They have several rooms full of hardwood planks, oddments and off cuts - unique pieces that are perfect for bespoke woodwork; we always seem to come away with more than we went for.

On this occasion we found some sweet chestnut that is going to look great as a gate, particularly when it weathers in and goes all silvery in colour. We've come up with a design heavily modelled on our National Trust inspiration, though for a single gate rather than a pair: two solid uprights, with three horizontals, and 5 sets of batons filling in the gaps.

Joe's been slowly chiselling away ever since - in odd 5 minutes here and there - though that's not to say that a few power-tools haven't been put to good use where it makes sense. He's now most of the way through the mortise and tenon joints that will hold the main structure together and relishing the challenge of a some proper woodwork to keep him busy.


Read More

Sunday, 24 July 2016

The Mechanical Doorbell, Part 2: Bash

One of our very first posts on The Urban Cottage was talking about our slightly fantastical doorbell, created from bits and pieces found around the house (follow the link for a reminder). This has been quite a talking point and provides us with much amusement when we open the door to a new visitor to be greeted with "is that your doorbell?! Please can I see it?".

The intention was always to expand this beyond it's initial "ding" to also include a "dong" but a couple of years later we ended up skipping that plan (for now) and instead went straight for "bash".


A very tired cymbal, looking for a new home, has been lined up next to the guitar. A short section of pipe left over from the bathroom is then carefully positioned to catch the marble as it speeds off the end of the original shute and directs it into the cymbal. 9 times out of 10 this then bounces and is caught in an old weaving shuttle.


All in all an excellent addition - not least because the previous incarnation was only just loud enough. If you were in a far corner of the house you were more likely to pick up the sound of a marble hitting the floor than you were the guitar. The cymbal certainly solves that problem!


Read More

Sunday, 19 June 2016

Oiling the Floor

One of the biggest projects we undertook while we were "off-air", was a transformation of our living room. I might have mentioned before that when we moved in we painted almost every wall in the place - but did little else, and now we're slowly working our way back through each room giving it a little more time, care and attention.


The living room for us is a place we spend much of our free time. It's somewhere for sitting with a laptop and planning our latest project, making music, doing crafty things and whipping up a blog post, and when all that's done it's also the place to relax and pop on the TV. The design of the house also means that this is the main thoroughfare - the only way of getting from the front door to the kitchen, conservatory and upstairs.

And it was a struggle. The furniture we'd brought with us from our previous house just didn't fit. Well, it fitted physically - but that was about it. The room isn't tiny (though by no means large), yet it felt cramped, crowded and messy. You had to zigzag your way around it all to get through the room, and more than a couple of extra people was a squish. After much debate we decided to go all out in getting this room sorted and that meant a couple of new bits of furniture.

(As we weren't thinking of blogging this we failed to take any "before" shots and as it turns out we've taken hardly any photos in this room over the years. To give you a small idea of what it was like here's the best of the bunch; a christmas photo of our decorated tree sitting in front of the piano, and a shot of us playing a card game on the floor with all the furniture pushed to the edges. Sorry if that's not much help!)


Changing our large three seater for a corner sofa, along with passing on our acoustic piano for a much more compact digital version allowed us to rethink how the room works with startling results. There's now a clear path from one side of the room to the other, space to pack in a few extra friends, and even some clear floor space for laying out that tangle of yarn that needs unpicking. The new piano is a marked improvement on the old one, inspiring much more regular playing even if we do still both have a definite fondness for the mechanics of a traditional instrument. More than anything, the room feels like it has doubled in size despite having almost as much stuff in it and that's all down to the change in layout.

Much much smaller piano, plus a clear path from the front door on the right to the kitchen on the left.
The understairs cupboard is more accessable and a new chair that can be both tucked
into a corner and pulled out into the main seating space.

But all of the above is a complete tangent - I was going to tell you about the floor!

There was one major flaw with the living room when we moved in (in our opinion anyway), and that was the cream carpet. I'm not adverse to using pale coloured carpets in the right place - but the highest traffic room of the house is definitely not that place. It constantly needed hoovering, and even then was never quite clean.  We were also starting to have problems with the chipboard underfloor having rather a lot of bounce to it. It either needed replacing or reinforcing before we found ourselves with a hole in the floor.

Our solution was to install an engineered oak floor, something solid that would wear well over many years as well as taking the pressure off the ageing chipboard. However, as we were fitting the planks into place we noticed that the finish on them was very uneven. There had been foam strips between the planks to stop them being damaged in transit and where the foam had been was much paler than the edges of the planks. After a few months of back and forward with the flooring company they agreed to send us enough of the hard wax oil they had used so that we could refinish the floor.

Uneven colouration can be seen around the edges of the central plank.

And so we found ourselves, just a short while after finishing the decoration of the room, emptying all of the furniture out again so that we could put a fresh layer of oil down. Fortunately, it has been completely worth the effort. The finish is much more even and the wood has a much warmer feel to it.


Transformation complete.


Read More

Wednesday, 20 May 2015

Done, finished, complete!

Yes, it can only be the bathroom!

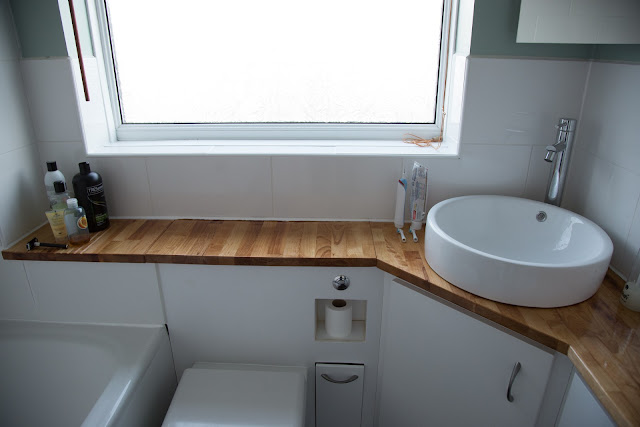
While we knew we were going to be squeezing a lot of this work in around the rest of life, I don't think either of us predicted it would take three and a half months! To be fair, most of the last month has been dealing with the things that didn't work first time. Finally though, we can say that it is finished. Finito. Done. Hooray!

First up though, a reminder of the "before" photos:


And now it looks like this:


Worktop with countertop sink and plenty of storage


Draining board for lots of bottles


Read More

Sunday, 26 April 2015

On going backwards and other such things

We realised, with great joy at the thought, that this weekend is the first of five weekends at home. That's five consecutive weekends with only a few bits and pieces in the diary. With a burst of enthusiasm we've made ourselves a list of projects we'd like to work on, almost certainly more than we'll get done - but its good to have aims in life!

First things first though, the bathroom. You may have noticed we've gone quiet on that one, and that's because the project has gone quiet - in fact with no help from us it's been going backwards. We've hit two snags...

Where the sink was....

The first is that around a week after rejoicing in the final fitting of the sink, we discovered that it was not to be the final fitting after all. A very slow leak appeared, coming from a manufacturing fault in the sink itself rather than our plumbing. This one has been really frustrating as plumbing leaks we can deal with (usually by applying a hefty dose of silicon sealant), but a flawed sink means it had to come out and be sent back for a replacement, damaging the finish on the worktop in the process.

Getting ready to refinish the scuffs and other damaged caused by removing the sink.

Our other set back is that the paint on the wall in one particular corner has started to react. Slowly but surely its been bubbling and peeling until we could ignore it no more.

Since the corner in question is the one nearest the bath and shower we debated if humidity was the problem. We stripped off the dodgy paint, made sure everything was dry and applied a fresh coat - and within a matter of minutes it started to bubble up again. Oh.

After the first coat of base coat the bubbliness was still coming through a little
- not very easy to photograph though!

Time to pull in the big boys. Over the course of the weekend we've applied several liberal coats of Base Coat by Polycell - the same people that make Polyfilla, which is supposed to seal in whatever is behind and allow you to paint your colour of choice over the top.  So far we seem to be winning - but we'll have to keep an eye on it.

So this weekend has been re-painting, re-varnishing and putting up the mirrored cabinet that arrived this week.

Forward progress at last - fixing the new medicine cabinet to the wall.

In other news, we've taken the old bath to the tip, revealing the lanky grass that's been hiding underneath it, and bonfired away some more of the bits that have been covering our patio. Oh and Lemon is having her first broody spell of the season - we had a couple of warmer days apparently and she was off, hunkering down in the coop at every possibly opportunity - eggs or no eggs. So starts the annual battle of wills....
Read More

Wednesday, 15 April 2015

The amazing colour changing bass guitar

Some of you will know that I play bass guitar (occasionally). I have long fancied making another and adding an extra string. When I spotted this 5 string guitar kit I decided it was time to have one. This time, rather than cutting the body out myself I got someone else to do it but it still needed finishing and assembling. Here's the picture highlights!

Dry assembly for marking the bridge location for pilot holes

Testing the finishes in places that don't matter once the sanding was finished.

Dye applied to the wood (wet). I had a pile of ancient fabric dyes in the garage I decided to try and they seemed to work quite well!

And the colour once dry. It really did change that much!

With the first layers of french polish it changed again.

All polished up.

Applying lemon oil to the fretboard.

Earthing the bridge with a bit of aluminium tape.

Checking the conductivity - you want the strings to be well grounded.

More bits go on. Several of the tiny screws for putting all the bits on were useless! I snapped a few even with pilot holes.

Wired up and fitting strings.


Read More

Wednesday, 18 March 2015

Refitting the Bathroom: 5. Two steps forward, one step back

A misleading title really since everything is part of the planned progress, but when you spend your Sunday evening undoing the work of a weekend it doesn't feel like it!


By the end of Saturday we'd got all the cabinets in position. Much chopping and sanding was needed to carefully shape each piece so that they all slotted together really well, but we got there in the end. We'd also cut the worktop into shape and could finally get a feel for how the finished bathroom was going to look. Seeing the wood of the worktop against the white of the tiles started to bring home how close we are to done.


After church on Sunday we cut holes in the worktop for both the sink and the tap and then sat those in position too. What do you think? From the start the counter-top sink has been one of the features we've been looking forward to and seeing it in position - even if not plumbed in - was a very exciting moment.


And then we had to take it all apart again! Our bathroom is now back to how it was a week ago and all the cupboard panels are down in the conservatory so that we can sort all the final details and get everything painted.


Read More

Wednesday, 25 February 2015

Refitting the Bathroom 4. Shower

Another bathroom post, I hope you don't mind; our lives currently revolve around little else and so the blog will naturally do likewise for a while still.

Since I last posted the focus has been on tiling in the hope we'd have the main walls done before the sparky arrived to wire in our new shower on Tuesday morning. This was a close call that saw us grouting like mad on Monday evening, but we did get there.

Tiled and grouted walls

This shower is one of the rather exciting bits about our new setup, a gadget for the bathroom! In the old bathroom the shower was one of those "connected to the bath taps" jobs, except that the handle to switch from bath to shower had long since snapped off and a spanner lived on the bathroom windowsill for this purpose. Having seen so many of the bathtap/shower combos that have failed over time we decided to try something different.

Shower fittings on the wall all ready to go.

Unfortunately, no matter how hard we tried to rearrange things, the bath and consequently the shower needed to go in the same location as before - with the shower head on a rather thin and flimsy stud wall. Worried about the weight of sitting a classic electric shower there we've opted for a digital shower instead. Any excuse!

The main body of our shower, tucked snuggly out of the way.

With a digital shower the bulk of the unit sits tidily away under the bath with just a small outlet for the shower head required in our stud - hopefully much less strain on the wall. The shower is controlled by a remote unit which, in the case of the one we've chosen, is wireless (you can also get digital showers where the remote is connected by a long length of wire). This means it can sit anywhere in the bathroom with no worries about water flow and pipework.

The wireless shower controller

Getting the shower wired into our mains has been the only job we've employed someone to do (well that and soldering up our pipework mishap), and yesterday Andy came and sorted it out for us. We used Andy to help us sort out the electrics when we first bought the house and he did all that was needed yesterday with minimal fuss which was great. All we need to do now is silicon around the edge of the bath and we can have a shower!
Read More