Showing posts with label Projects. Show all posts

Sunday, 15 May 2016

Wall Building

Where best to start blogging again than a project that's been going for almost as long as The Urban Cottage, and was finished just last week. We have a lot of projects around here that are half finished. Some tucked neatly away in a corner waiting for the right moment while some are deliberately left where we can't ignore them until they've been there long enough that that's exactly what we do. Some take forever in the planning stage, and some linger endlessly in the finishing stages.

This particular project has been all of those and more! Three years ago we were offered a large quantity of stone that we decided was just the thing for replacing a hedge we weren't particularly fond of. We sat it in an unused corner of the drive "temporarily". It's also been three years since we bought a set of lavender plugs to go in a new flower bed we would build with the stone and gave them a temporary home.


Skip on a bit to last summer when we moved all the stone onto our patio, sorted by size and shape. It took over the area somewhat! Then the old hedge came out thanks to brute force on Joe's part, and it was time to start being constructive. By the end of the summer we'd successfully put in the two smaller walls that now form flower beds alongside the drive, and had made a start on the main wall that will divide the front garden from the back. Progress at last.


Once more the project lay dormant, this time for a just a few months. Wind, rain and generally winter got in the way.

And then it was spring again. Looking at what to do next we decided it was more important to get the plants in place and finish the construction around them, than leave them in their rather overgrown temporary home any longer. The beds got a good filling of muck and grit and the lavender finally got space to breath. We also popped in quite a few allium bulbs that had been in the conservatory all winter and were starting to sprout. Both are showing excellent signs of new growth already which is very pleasing.


The last few weekends have been just right for a final push. Joe's steamed ahead and I think we can now say that is is done. All in all this has definitely been a successful transformation.

There's so much more to do in this area of the garden and we're both really excited by the blank canvas that this wall has given us. The phrase "courtyard garden" has been bandied about, sometimes accompanied by "Mediterranean"; we'll have to see where our ideas take us with this one.

Before:


After:


Read More

Wednesday, 20 May 2015

Done, finished, complete!

Yes, it can only be the bathroom!

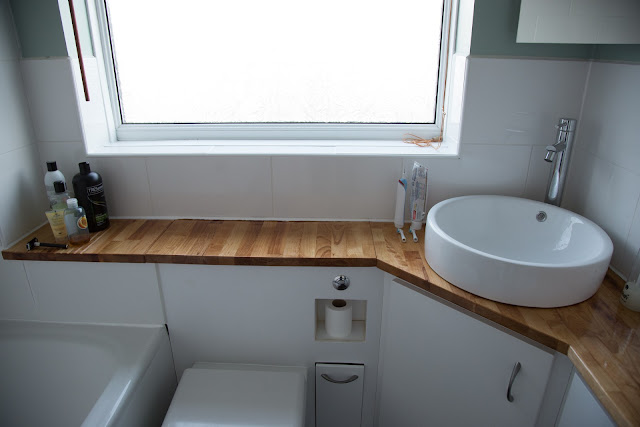
While we knew we were going to be squeezing a lot of this work in around the rest of life, I don't think either of us predicted it would take three and a half months! To be fair, most of the last month has been dealing with the things that didn't work first time. Finally though, we can say that it is finished. Finito. Done. Hooray!

First up though, a reminder of the "before" photos:


And now it looks like this:


Worktop with countertop sink and plenty of storage


Draining board for lots of bottles


Read More

Wednesday, 29 April 2015

Big Cables and Little Ones Too

Finished!

All done, it took a little longer than hoped, but then life has been busier than planned. The pattern was very straight forward to follow and well written, the yarn is lovely; soft and cosy, and its a nice fit. What more is there to say, except perhaps, what's next?


I'm definitely a one project at a time sort of person. My knitting time is limited and the busier my knitting bag is the less time each thing gets. For the most part I'd rather work on one thing and have the satisfaction of a finished project, than to try and complete lots of knits at once.


Except when a more exciting project comes along. Then, for example, I might finish a jumper and discover half a glove in the bottom on my knitting bag. Shame it's not really glove weather anymore isn't it?


Read More

Wednesday, 6 November 2013

Summer Knits: 7. Giving It Some Body

We've recently taken our third and final weeks break for this year and that means more knitting! Joe took the opportunity to crack on with the toddlers cardigan he's been working on. He's now finished the shoulders, separated off the sleeves and is working his way down the body. It's really starting to take shape now.


Meanwhile my cardigan now looks like this:


Finished, blocked, ends tucked in and being worn. I'm really pleased with it (*does a little happy dance*). I have to admit though, that I've yet to sew on any buttons because I'm being very indecisive over which buttons to use. That doesn't stop me wearing it though.


While it's not the most complicated pattern I've followed, it's certainly the finest wool I've ever used (3ply). I've only used 254g of the 500g I bought (ebay bargain!) which leaves me wondering what to do with the rest. First though, there are plenty of smaller projects in the pipeline...


Read More

Wednesday, 16 October 2013

Summer Knits: 6. Moving On Up

Hooray, I finally did it. Two sleeves completed, joined to the rest of the body and I've now started to work on the yoke. Progress is slow as each row contains 409 stitches at the moment, but its good to be working on the main body again. It's all downhill from here.


Read More

Wednesday, 2 October 2013

Summer Knits 5. Must there be two?

While it's definitely autumn now our Summer Knits are still progressing but I must admit I'm getting a little impatient with mine at the moment. It's an impatience that I'm sure that everyone who's ever knitted socks, gloves, mittens or a jumper can probably attest to.... I'm knitting the second sleeve! I really want to get working on the yoke, which is going to be by far the most interesting bit of the whole thing, but I can't until I have two sleeves. *Sighs*

We've got lots of driving and plenty of time sat chatting to people this weekend so hopefully I can plough on and get to the interesting bit soon. Fingers crossed, eh?


p.s. I know I talk about my summer knit much more frequently than Joe's. That's because he's a much busier person than I am, coupled with being a new knitter, and as such is making much slower progress. I'll show you how he's getting on when there's something to show. 

Previously: 4. Bust Shaping
Read More

Sunday, 8 September 2013

Summer Knits: 4. Bust Shaping

You may have noticed that as I've been making more clothes for myself of late I've been paying a little more attention to how they might actually fit rather than blindly following the pattern. My current knitting project is no exception.

Reading around on the internet I recently came across the concept of bust shaping when knitting jumpers. The theory is that if you knit the front and the back of the jumper the same then the front will look too short because it has further to travel than the back thanks to the bust. If you have a bust larger than a B cup then it's sometimes recommended to add little extra length to the front of the jumper to compensate for this. You do this by adding some short rows across the front, which gives the same effect as adding a dart when sewing a top.

Short rows are a simple concept - you simply turn your work round before you reach the end of the row and start working back the other way. This means that you have two rows over that part of your knitting, and only one row over the remainder.

Theory aside, I thought I might give this a go, but because I'm a coward I've only adding a little bit extra - not the full amount - so that I could see how it works without going crazy. I started knitting the patterned part 2cm later than the pattern suggested and then added 6 short rows, starting just before the pattern reaches its widest point. With the cardigan I had to knit the short rows on the right front part, finish the row and then do short rows to match on the left hand side.

It turns out this is a very hard thing to photograph - it disappears!
Just to the right of my index finger the stitches change angle, this is the extra
rows being put in.

and the same on the left front.
I think its gone well. The bit I'm least satisfied with was how to do the final turn which happened to fall just at the edge of my lacy pattern. On the right hand front the turns happened on the right side of the knitting which I adapted by skipping the last bit of the pattern and starting it again on the next row which seems to have left a knobbly bit. On the left hand front the turns happened on the wrong side of the knitting (a simple purl row) which was much easier to adapt and has left a neater finish I think. Sorry if that made no sense at all!

Having done this once I'm pretty sure I'd do this again, and maybe with a bit more confidence on my next jumper. Lets face it - this isn't going to make much difference to the way the cardigan fits.

Either way, that's now done - on with the pattern!

Previously: 3. A long weekend of progress
Next: 5. Must there be two?
Read More

Sunday, 1 September 2013

Summer Knits: 3. A Long Weekend of Progress

We spent a very relaxed bank holiday weekend camping in the New Forest. There were barbecues, sunsets, coffee shops, large quantities of tea, cooked breakfasts, plenty of the infamous ponies and naturally lots of knitting done.

New Forest Pony

Since we've both made quite a bit of headway with our respective projects we thought it might be time to share an update on the knits we started in June. Jenny has had row after row of stocking stitch to muddle through - but she's finally reached the interesting bit where the lacy pattern starts and the fun begins. Meanwhile, Joe has been beavering away at the yoke part of his cardigan and has almost reached the shaping of the sleeves.

Working from the neckline towards the sleeves. Almost there.

Diamond upon diamonds...


Lots of length added since you last saw it, hopefully in the right size this time!
Finally starting the lacy pattern.

How did you spend your long weekend?

Previously: 2. Oh Bother
Next: 4. Bust Shaping
Read More

Sunday, 18 August 2013

Patchwork Quilt: 3. A Guide to Paper Piecing + Free Pattern!

Following on in our patchworking series, we thought we'd talk you through the paper piecing process with our latest quilt as an example. Even better - we'll show you how to make one of the blocks we designed - and give you the block pattern for free!

What is paper piecing?

As far as I'm aware there are two styles of paper piecing - English and American. English paper piecing involves tacking the material to lots of paper diamonds or hexagons and then sewing along the edges that are nicely defined by the paper inside, creating intricate regular patterns. American paper piecing involves having your pattern drawn on paper, sticking the fabric to it and sewing along the lines, trimming the shapes to size as you go along. American paper piecing is often used to create more unusual shapes. At the end of both you remove the paper templates. These methods allow precise piecing of shapes and patterns which is exactly what we need with these celtic knot blocks. We're using the American paper piecing in this case.


Left: This quilt by Jenny's mum uses English paper piecing. Right: Our cat quilt is American paper pieced.


How is it done?

1. Start by printing the pattern onto freezer paper. This paper is normal on one side - which allows you to print on your design, while the other side becomes sticky when warm - this means you can iron your fabric to it and it will stay put. In the case of this celtic knot, the patten is made up of three triangles. Cut out roughly around the quarter inch seam markers.
Tip: make sure that your printer is set to no scaling, or 100% scaling to make sure your block is the right size.

A, B and C triangles printed out and trimmed.

These instructions are for one A triangle: for the instructions for a whole block keep reading.


2. Then cut out the material for the A1 shape. These pieces of fabric don't need to be accurate - so long as they are big enough to cover the shape plus 1/4" seam allowance all the way round. Place the fabric pattern side down on your cutting board and then place the paper on top of this printed side up. Cut around the shape you are after, but don't cut the paper! While you're here you might want to cut out the rest of the pieces for the A triangle too.
Tip: remember to think about which way round the fabric will end up - and which direction you might want your fabric to sit. Is the pattern directional?


A1 cut to fit the shape plus seam allowances, plus a bit extra.
3.Take your first piece (A1) and iron it, right side up, to the shape labelled one.
Tip: put the material onto the ironing board first, followed by the freezer paper sticky side down  so that your iron doesn't stick to the paper.


A1 ironed to the paper.

4.Take A2 and sit it right side down on top of A1. The shape should sit such that when you sew along the line between A1 and A2, fold A2 open and iron it flat, A2 will cover its requisite shape and seam allowance. Getting this positioning right can be the key to the whole process, so take your time and find a way that suits you. Cutting your material with plenty of room to spare will also help this.

5.Sew along the line between A1 and A2.
Tip: set your machine to a small stitch length, the more holes you make at this stage the easier it will be to remove the paper later.


Sewing the line between A1 and A2.

6. Fold back A2 along the seam and check that it sits correctly. If it does then hold the paper out of the way and cut the seam to 1/4".

Folding the paper out of the way, ready to cut the seam.
Trimming the seam to 1/4".

7. Fold open A2 and press it into position.

Pressing A2 open, and sticking it to the freezer paper.
A2 in position.

8. Repeat steps 4-7 for A3, A4 and A5, completing each in turn before progressing.

Once all the pieces have been attached and pressed, well done - that's the basis of paper piecing.

A triangle finished. Don't worry about excess material at this stage.


So how do I make the whole block?

In order to make a 9" x 9" celtic knot block you will need:
  • 4 print outs of the pattern
  • 1 backing fabric
  • 2 contrasting patterned fabrics for the rings - we used a jelly roll for these (2.5"x44" of fabric)
This pattern relies on making four matching quarters but in two different colourways.


Following the paper piecing guidelines above you will need to make:
  • 2 A triangles where
    • A1 is colour 1
    • A2, A3 and A5 are the background colour
    • A4 is colour 2
  • 2 B triangles where
    • B1 is colour 1
    • B2 and B3 are the background colour
  • 2 C triangles where
    • C1 is colour 2
    • C2 is colour 1
    • C3 is the background colour
and 

  • 2 A triangles where
    • A1 is colour 2
    • A2, A3 and A5 are the background colour
    • A4 is colour 1
  • 2 B triangles where
    • B1 is colour 2
    • B2 and B3 are the background colour
  • 2 C triangles where
    • C1 is colour 1
    • C2 is colour 2
    • C3 is the background colour
When you have this it will look like this:

 Yes, this is made from different material - but the theory is the same.

Next sew each C triangle to a corresponding B triangle (the colours of B1 and C2 should be the same), so that the points marked match.

Ready to sew B to C

If you're happy with the join then trim the seam allowance to 1/4" and remove the paper along this edge. Press open to make a large triangle. 

Then sew each B/C triangle pair to a corresponding A triangle (the colours of A1 and B1 should be the same). Repeat the process of trimming, removing the paper and pressing the seam. After this you should have four squares, two of each colour option.
Tip: getting all points to match nicely can be hard work. We tack ours in place before sewing properly. 
One half done, time for the other.

Finally, sew the squares into pairs, and then into a whole square. Again, trim and press each seam as you go.


Congratulations, you've completed the block, time for a large cup of tea!

Here's the pattern. We've made a PDF version for you, but also included the Quilt Assistant file. This program is free to download, and will allow you to scale the block to make different sizes - or modify it completely if you wish.

If you make the block do send us a picture - we'd love to see the different variations.


Read More

Sunday, 11 August 2013

Patchwork Quilt: 2. So what's the plan?

We've mentioned a couple of times recently that we've been putting some effort into making a patchwork quilt. A rather large quilt at that. So what's the plan?

We're working on a quilt to sit on our king-sized bed. We've a whole mish-mash of fabric that follows a broad colour theme (it might almost be a rainbow - but its a specific rainbow!). The design is still rather sketchy, based on five different two-stranded celtic knots of various complexities.There's been some progress in the last couple of weeks, let me show you where we've got to so far.

We've made five squares of this Tangled Star design:


And we've started work on this block, which is our own design. So far we've completed one square and partially made a further two:


We're also working on the patterns for the other three knots. We've been struggling to find suitable patchwork patterns for this and fancied the challenge of designing them ourselves. Finding knots that have two strands, work in a square (rather than a triangle), and are pretty yet simple is proving complex, but with the help of Quilt Assistant it's proved to be a fairly straight forward job making patchwork patterns out of our designs once we've got that far.

Our overall aim is to have five blocks across, and six deep, plus borders and edging and all those other things. We've a long way to go yet, but this is definitely one project we wouldn't have started if we didn't enjoy the process!
Read More